Need help taking screenshots on your Mac? This guide is all for your rescue when the feature – screenshot on Mac is not working.
When you are an everyday Mac user, be it for studies, working at an office, chilling, or just any other part of your life; Screenshotting on Mac is a feature that you cannot just let go away. It comes in handy most times, and honestly, for some users, it is a core feature they cannot live without. Imagine being a sales or customer-support representative, app or feature tester/developer, or creative artist who wants to share a part of their creativity. Be it anyone, screenshotting on Mac comes in handy, and when it doesn’t work, a lot of users might start missing it too much.
In this guide, I will help you with some easy steps to solve the screenshot on the Mac not working. By the end of this helpful guide, you should be able to peacefully get back to taking screenshots on Mac. And if you do, then spread the word about this handy guide on your social platforms and help others too.
Also read: How to Delete Screenshots on a Mac | All You Need to Know
Now, let’s get back to fixing screenshotting on Mac not working issue.
7 Steps to Fix Screenshot on Mac Not Working Issue | Solutions that Actually Work
Before heading to fixing Mac screenshotting feature not working, let’s try taking some screenshots. Here are some cheat codes to take screenshots on Mac,
- Command+Shift+3: Takes a screenshot of the entire screen on your Mac.
- Command+Shift+4: Screenshot using a cursor with a custom selection area with a tap.
- Command+Shift+4+Space: Screenshotting a menu or a window from your Mac screen.
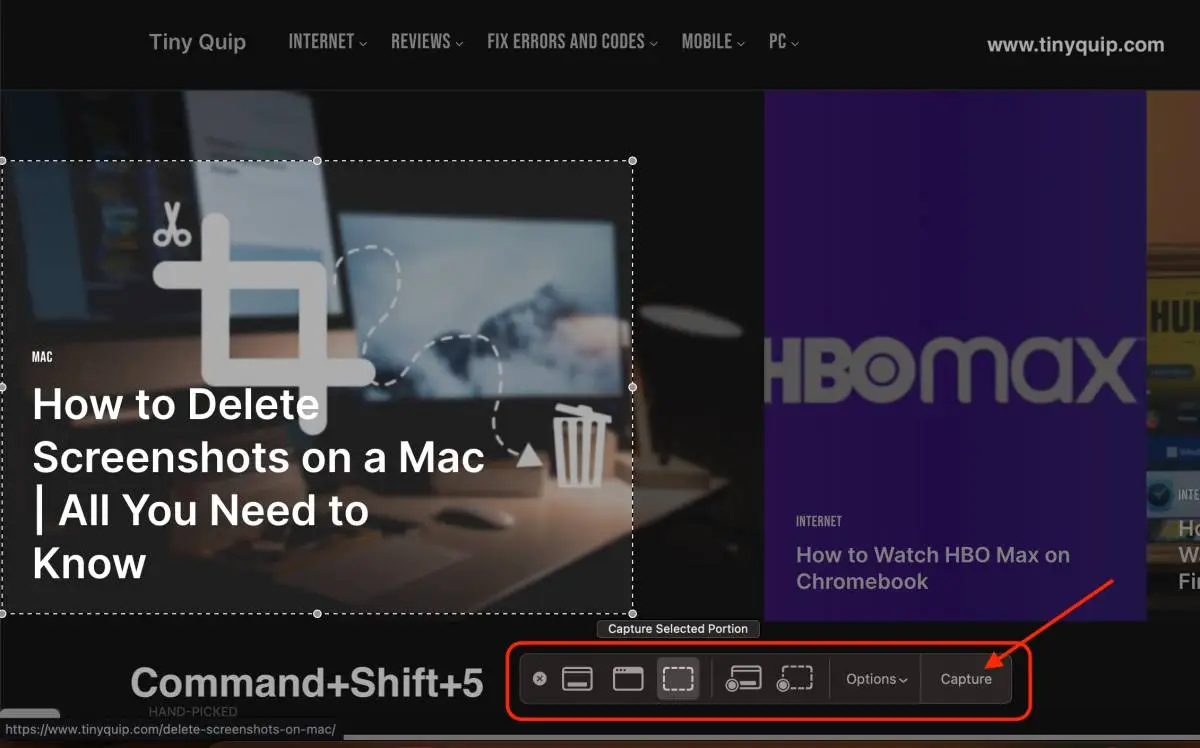
- Command+Shift+5: Capture the entire screen, a window, and a selected portion.
Try the above commands and check if you are able to take screenshots on your Mac. If not, let’s jump in to solve why screenshots on Mac are not working.
Also read: How to Take a Scrolling Screenshot on iPhone?
1. Check the Keyboard Shortcut Settings
The most common blunder or mistake with not being able to screenshot on Mac is when the keyboard shortcuts are turned off automatically. This can be mostly accidentally or when your Mac is shared, and other users don’t like having keyboard shortcuts.
Keyboard shortcuts are pretty handy when it comes to taking screenshots on a Mac. No doubt, you can still use the dedicated “Screenshot” application from the “Utilities” folder, but that’s just a long process that you wouldn’t want to spend time on, especially when you have tons of screenshots to take.
So, keyboard shortcuts are handy when screenshotting on Mac, but how do you know if they are enabled? Let’s check through a step-by-step guide on it.
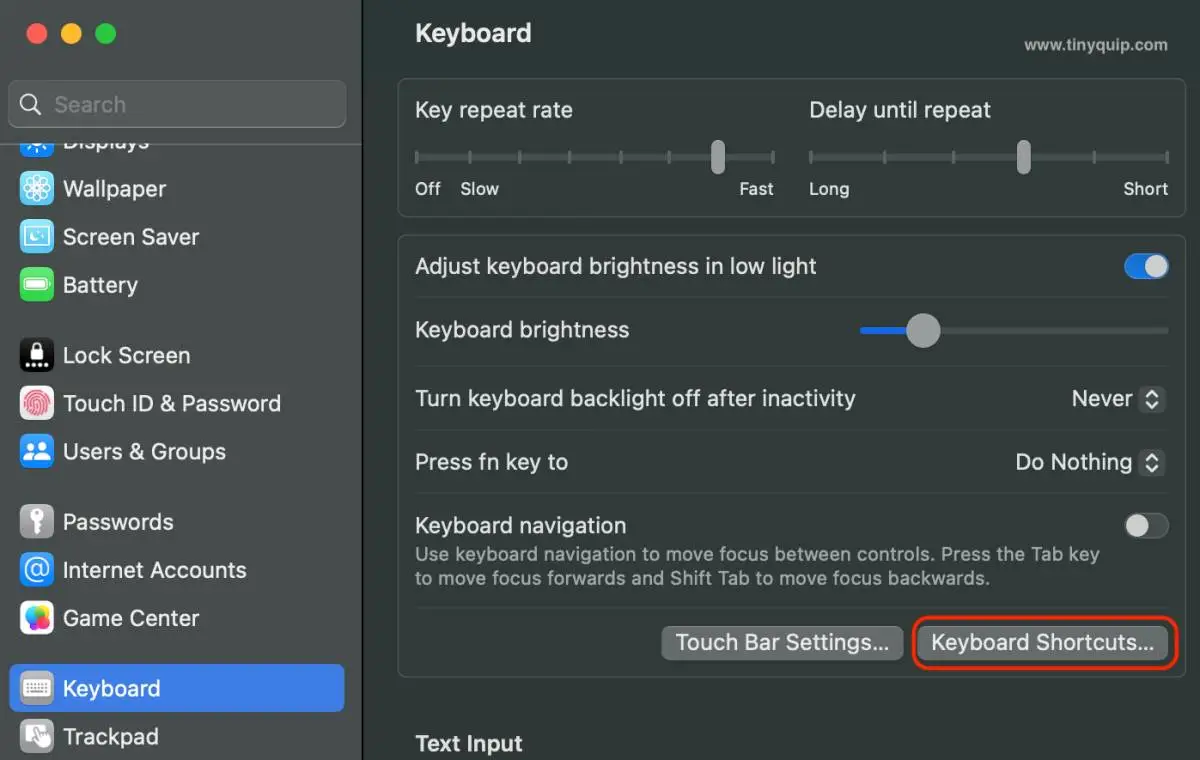
- Open the “System Settings” app on your Mac; you can either open it using the “Apple Menu” in the top left of your screen or use the app drawer.
- Scroll down the options in the “System Settings” until you find the “Keyboard” option.
- Now, look for the “Keyboard shortcuts” and tap on them.
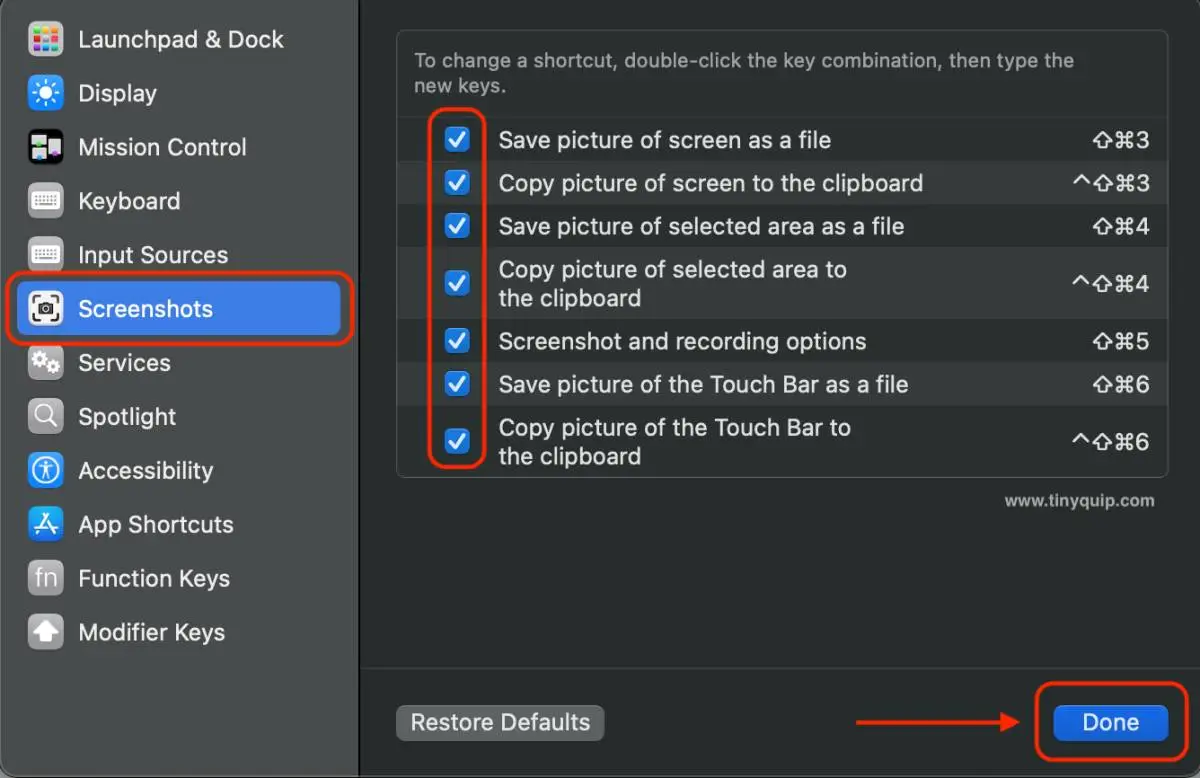
- On the left of the keyboard shortcuts window, you can find the “Screenshots” option; click on it to view related settings. On the right of your keyboard shortcuts screen, ensure you have enabled all or desired screenshot shortcuts options.
Now, check if you are able to take a screenshot on your Mac and if the problem is resolved. If you are still facing an issue, hop on to the next solution in the list.
Also read: Mac Keyboard Not Working or Unresponsive? Here is How to Fix it.
2. A Simple Mac Restart to the Rescue
You might not believe it, but restarting your Mac is often the solution that works for most system-related issues. It is because, during the Boot or system-run process, a small error could trigger your Mac to work improperly, and, in this case, the screenshot is not working issue.
So, let’s give our Mac a restart and check if the Screenshot not working issue is resolved.
To restart your Mac,
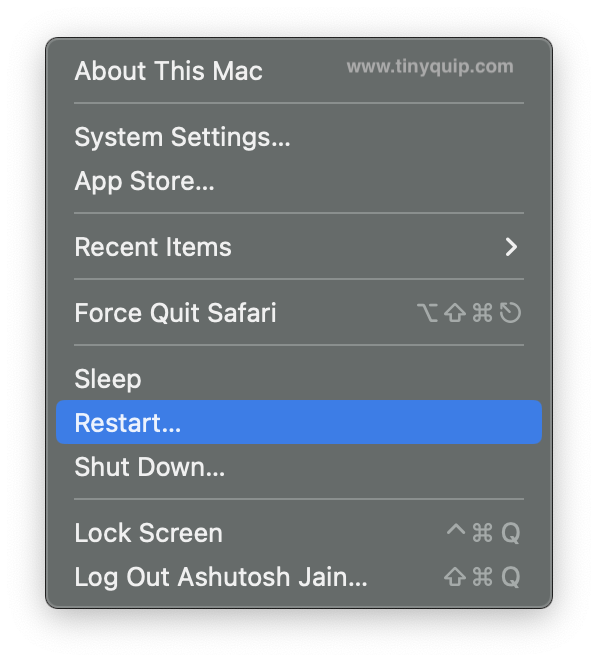
- Tap on the “Apple” icon from the top-left of your screen.
- Click on the “Restart” option from the Apple menu.
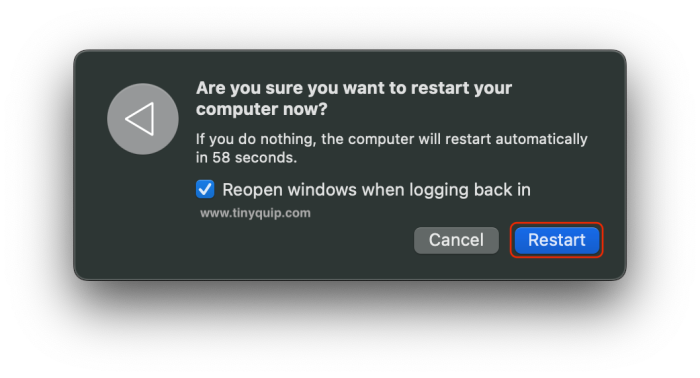
- You will now be prompted if you wish to reopen the windows once your Mac is restarted. You choose to reopen the windows or do a clean, complete restart, depending upon your preferences.
- Once done with your selection, tap on the restart button, and your Mac will now be refreshed.
After the restart process is complete, let’s check if the screenshot not working issue is resolved on your Mac. If yes, you can end this guide here, and if you are still facing an issue, let’s hop on to the core solutions for it.
Also read: How to Block a Website on Mac -Content, And Privacy on Mac
3. NVRAM Test | Resetting the Display Resolution on Mac
If you have any idea about how the hardware on a machine like Mac or Windows works, you might know about the memory blocks. Everything, from the boot program to minute operations on machines, is stored in the memory blocks and retrieved from the same. And machines don’t have a single memory block; there are thousands of them.
One such memory block is the NVRAM memory which stores some basic information such as time zone, resolution, volume, display settings, and much more. So, when the boot process is initialized, these memory blocks are the first to be tested, and in some instances, they might not work as they should and cause minor issues like screenshots not working.
Restarting your Mac should help you refresh this memory in some cases, but if it doesn’t, you might want to reset this individual memory block: NVRAM.
To reset NVRAM, shut down your Mac and power on using the power button. Once you hear the startup sound, hold “Command+Option+P+R” for almost 20 seconds on your Mac keyboard until your Mac is turned on. Once done, check if you are able to take a screenshot on your Mac, and if the problem persists, hop on to the next solution.
Also read: How to Disconnect an iPhone from your Mac | 11 Things to Do
4. Safe Boot your Mac
Safe booting your Mac is one of the best ways to analyze what is causing issues like the screenshot not working, slow Mac, app crashes, and more. When your Mac is in the safe boot mode, only system programs are run that are required to operate the Mac along with the necessary applications. Meaning all your third-party applications are not run in this mode.
The safe Boot also checks for hardware and software-related issues, just as you would do with the First Aid or Disk Utility programs on your Mac. This is to check if all the components are working fine, and if they are not, you might want to update or downgrade your operating system or get your Mac to the nearest Apple store for a hardware check.
Here are more common times when you need to safe Boot your Mac,
- Issues with macOS software not updating or failing to update
- macOS is freezing or is unresponsive
- Your device is restarting itself or repeatedly crashing
- Issues with internet connectivity
- Third-party apps conflicting
- Unable to boot your macOS normally
Now that we know that Safe Boot does most of the magic for you, the question now is, how do you enable the Safe Boot mode? For this, we have a completely dedicated standalone guide on how to boot your Mac in Safe Mode, depending upon Intel or Silicon-based hardware.

Once you are in Safe Mode, check if you are able to take a screenshot on your Mac. If you can, I would recommend you upgrade your OS to the newer version, and if a newer version is not available, it is best to downgrade to a more stable version and check if the issue persists.
5. Update your Mac to a Newer Version
Updating your Mac is one of the best ways to ensure your device is free of errors and vulnerabilities. Often, developers patch certain errors and bugs with the launch of newer updates. In case you are not able to take a screenshot on your Mac, it can be likely a system-level issue that can only be resolved by updating your macOS to a newer version. It is also likely, that if you have recently updated your macOS, the newer update is causing an issue and needs to be resolved by updating your macOS to a newer version or downgrading to a more stable version.
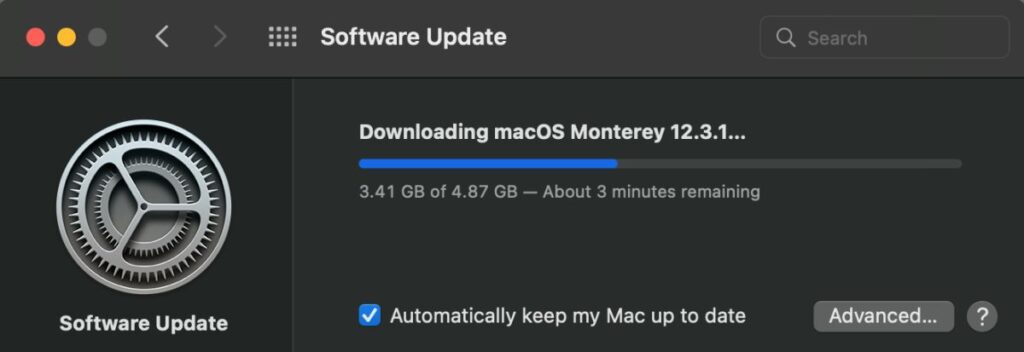
Here is how you can update your Mac to a newer version of macOS,
- Open the “System Settings” app on your Mac; you can either open it using the “Apple Menu” in the top left of your screen or use the app drawer.
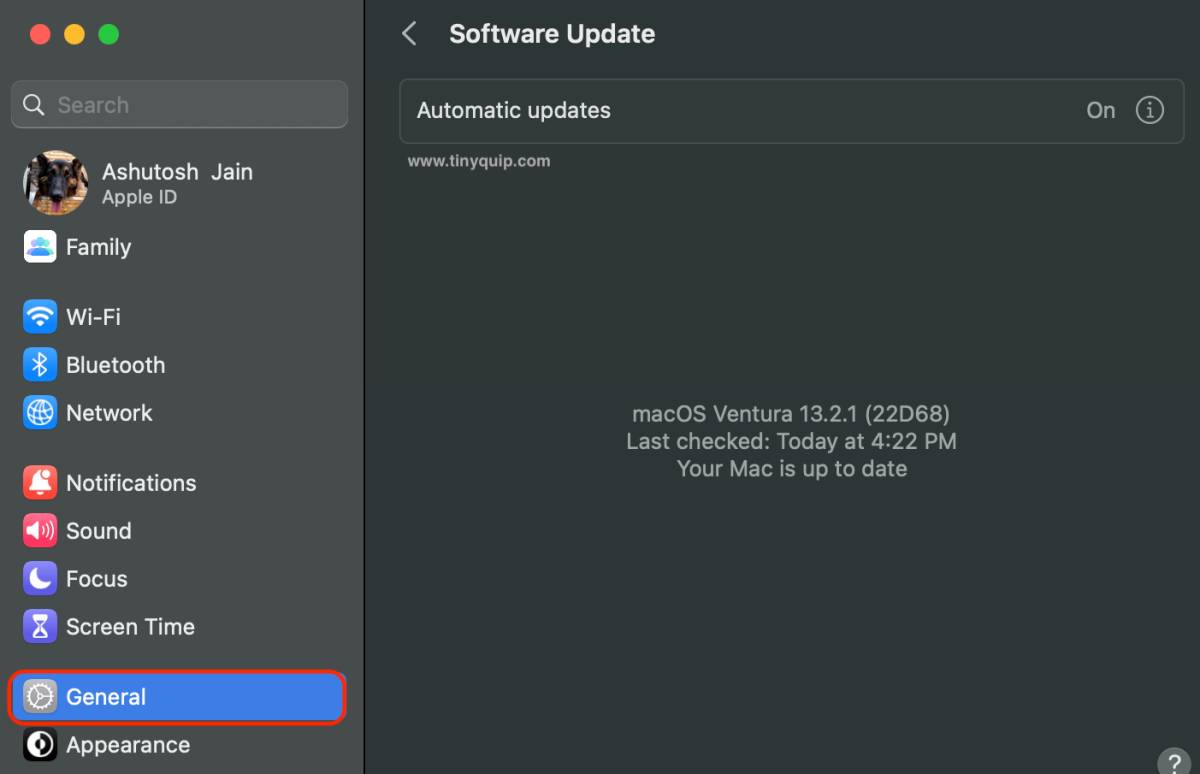
- Select the “General” menu from the “System Settings” and then tap on the “Software Update” option from on the right of your “Settings” window.
- Your Mac will now look for newer updates if there are any. You can also keep your Mac up-to-date by turning on automatic updates.
- Once you find an update, complete the process and wait till the update is successfully installed on your Mac.
Updating your Mac requires a fast and best internet connection. But is your WiFi doing any justice to you? Connection drops, poor internet connection, and buffer streaming are big headaches. So, I recommend you check out some accessories like Internet speed boosters and extenders and ethernet cables to get the most out of your connection. Especially when updating your Mac or while most of your internet is on-demand entertainment.
6. Taking Screenshots from the Utilities Application
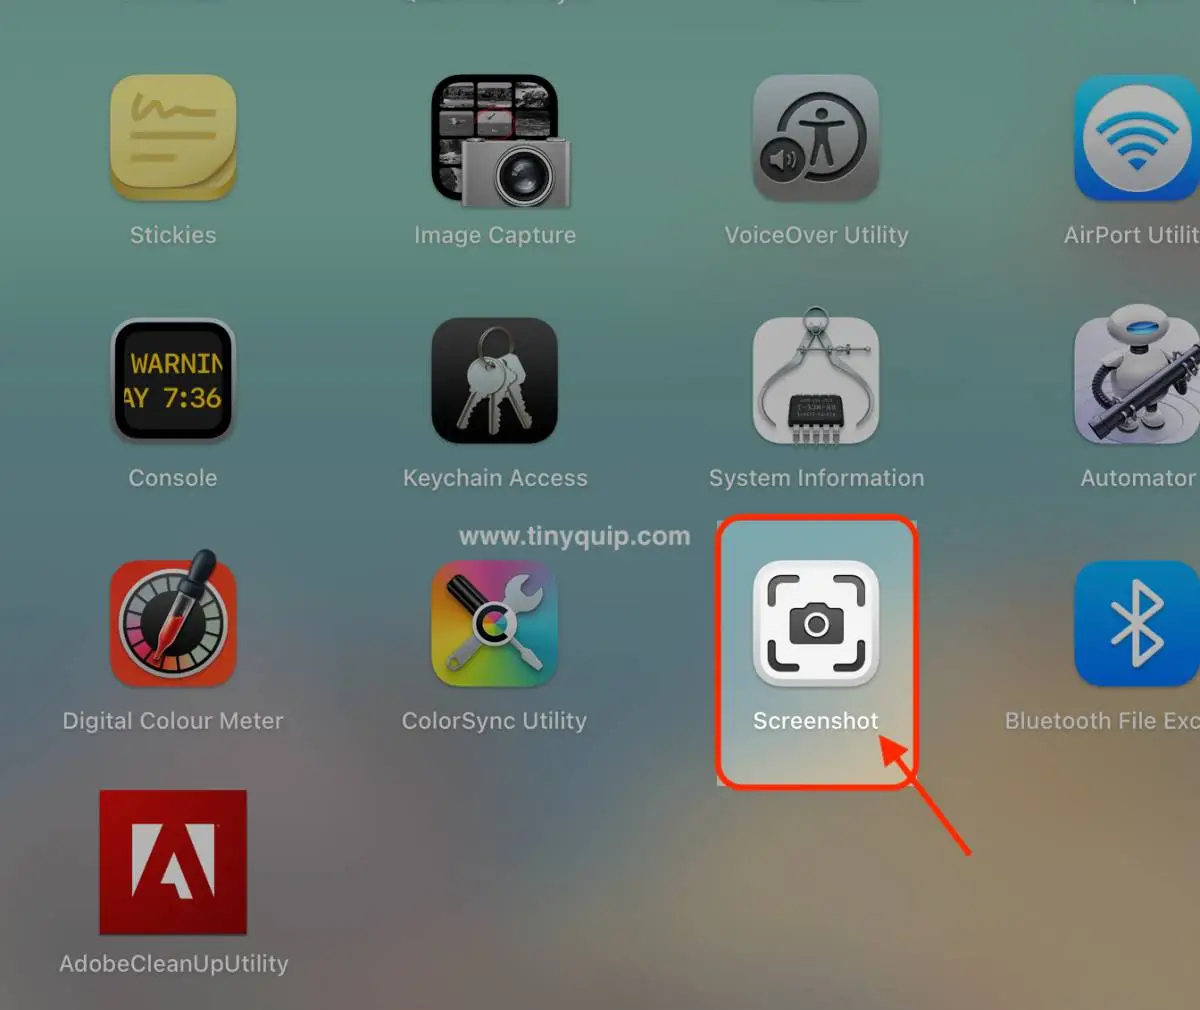
If the screenshot on Mac is not working with the keyboard shortcuts, you might want to check it out using the application. On Mac, Apple offers an application called “Screenshot,” which basically does the same, screenshotting on your Mac, which you would do with the keys.
Now, with all the solutions above, our task now is to check if you are able to screenshot on your Mac at all. If you can screenshot using the application, there is likely something wrong at the software level or the hard level that isn’t allowing you to screenshot with the keys.
Let’s check out how to take a screenshot on Mac with the Screenshot application on your Mac,
- Open the app drawer on your Mac using the gestures you have set on the mouse; for me, I am using the default four-finger gesture to open the app drawer.
- From the app drawer, look for the “Others” folder; this is basically a default folder created by Mac with all the utility tools under one folder.
- Here, you can find the “Screenshot” application; tap on it.
- You should now see a toolbar on your screen with options to screenshot a window, the entire screen, or the selected area.
- Make your screenshot choice and press enter to see if the screenshot was captured. If it did, check for the screenshot on your Mac if it was stored.
This is the alternate way to take a screenshot on your Mac until a newer update is released. There can be both software and hardware reasons why you are unable to screenshot on your Mac with the keyboard shortcuts. Along with these, there can also be malware.
Also read: How to Install youtube-dl on Mac | MacPorts, Homebrew, & More
7. Check for Malware and Keep your Mac Clean
One of the things I love about Apple is how closely packed it’s software architecture is. No doubt, it is still at risk to certain kinds of malware, but in comparison to other common operating systems, macOS is a lot more secure.
However, minor malware that goes undetected by Apple can cause uncommon operations with your Mac. For instance, it can cause an issue like how you are now facing the screenshot feature on Mac is not working. For both internet security and a shield against malware, I suggest you have an anti-malware application installed on your Mac. This application would keep your Mac clean and away from such issues.
Some of the popular options out there is CleanMyMac X, and it is one perfect app to keep your Mac away from bloatware, junk files, and malware. However, I would like to add something more to it, and it is none other than my favorite BitDefender Anti-malware.
Also read: How to Change the Default Browser on a Mac Computer
Frequently Asked Questions [FAQs]
There can be a couple of reasons why the screenshot feature is not working on your Mac, but for me, the prime reason is when the keyboard shortcuts are disabled.
To reset NVRAM on your Mac, shut down your Mac and power it on using the power button. When you hear the startup sound, press the command+option+P+R button on your keyboard for 20 seconds or till the Mac boots successfully.
The possible reason for this is you have accidentally or unknowingly disabled the keyboard shortcut for the screenshot on command shift 4.
Before You Leave
Get Our Prime Content Delivered to your Inbox for Free!! Join the Ever-Growing Community… Right Now.
Give this article a quick share,
Wrapping up: Screenshots on Mac are Not Working
Hopefully, you should now be able to screenshot on your Mac easily. Screenshotting mac is an essential feature that comes in handy most times, be it when you are a customer-relationship manager, want to report a bug, or for all the good reasons you use your Mac for.
You might also like to read,
- MS Word Not Opening on Mac? Here is the Fix
- Fix: Unlock with Apple Watch Not Working on Mac
- Best MacBook Pro and Air Accessories
I hope to have helped you with how to fix the issue with screenshots on Mac not working. If you are still facing an issue or have found an additional solution to this problem, do let us know in the comment section. If you like this article, do give this a quick share on your social media handles and do tag us. Also, join our Telegram channel, Facebook page, and Twitter to never miss a quick update.


